Concept Helix Installation Guide
Innovating the Way We Grip
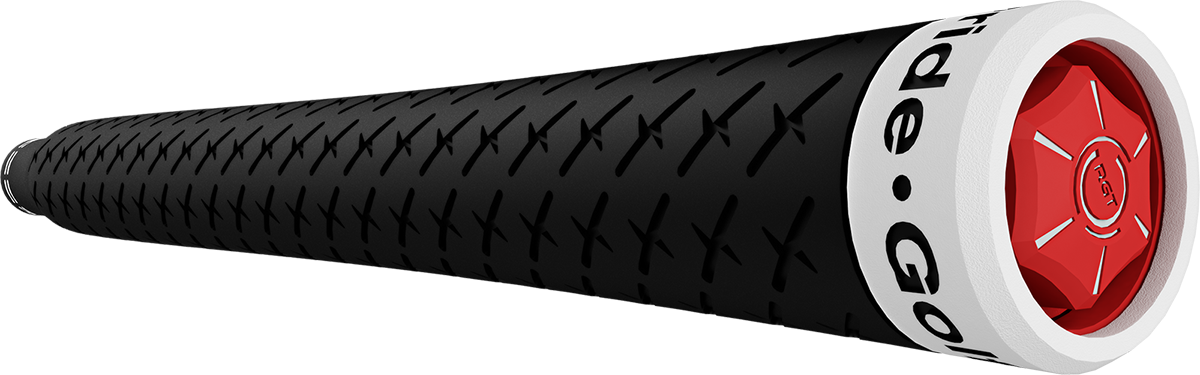
Concept Helix is the first-ever twist-on golf grip – no tape or solvent required. Change your grips anytime, anywhere, in just seconds. It’s the start of a grip installation revolution.
Concept Helix Installation Process
Step 1: Removing Your Old Grip
The Tools You'll Need to Start
Utility Knife & Hook Blade
Heat Gun or Hair Dryer
(Optional)
(Optional)
Paper or Cloth Towel
Rubbing Alcohol, Mineral Spirits or Adhesive Remover Solvent
- Note: Always wear eye protection when removing old grips.
- To remove your grip, secure the clubhead underneath your armpit, place one hand on the shaft, then take a hook blade and slice away from your body, starting at the bottom of the grip and cutting towards the butt end. Then, peel the grip off the shaft until all rubber is removed.
Tips
- When removing old grips, make two cuts if necessary - one on each side - to make the grip easier to remove.
- Use caution when removing grips from a graphite shaft, being careful not to scratch or cut the shaft with your hook blade.
- Using an old or dull hook blade is not recommended. A new, sharp hook blade is safer to use and will cut more easily, helping prevent damage to shafts. Replacement hook blades and utility knives are cheap and easy to find at your local hardware store.
To remove tape from the shaft, use your hook blade to cut tape from the shaft opening, then use your hands to peel off all remaining tape.
Tips
- Optional: Using a heat source, such as a heat gun or hair dryer, is not required to remove tape, but it is recommended. If using, apply heat evenly to the tape to loosen the adhesive and make the tape easier to remove cleanly. Be careful not to overheat or burn the tape.
- If using a heat gun or heat source to warm tape before peeling off, use extra caution and don’t over-heat graphite shafts to avoid damaging the shaft. It’s best to keep the shaft and/or the heat source moving at all times to avoid burning the tape. Be aware that the shaft surface can get hot – use caution.
In order to properly install Concept Helix, your shafts must be clear of all previous tape residue and shaft bands or stickers in the area the grip will cover. There can be no tack or stickiness on the shaft, and the shaft opening must also be clear of tape. To remove residue, wipe the shaft clean with a microfiber towel and an adhesive remover such as mineral spirits or rubbing alcohol.
Step 2: Installing Concept Helix
The Tools You'll Need to Start

Horn

Concept Helix Grip
Note: Do not throw away the Concept Helix installation horn! It is required to install or remove the grip. We recommend keeping the horn in your golf bag, or wherever you regularly change your grips.
- Once the shaft is clear of all tape and tape residue, slide the mouth of the grip over the red ‘horn’ prongs, until the grip reaches the raised notches halfway down the prongs.
- Position the horn & grip over the end of the shaft, sliding it on just slightly to help widen the mouth of the grip.
Tips
- Begin with a clean shaft. The shaft should have no tape or excess material.
Place the clubhead on the ground, preferably on a soft surface such as carpet to prevent damage, and secure the clubhead with your feet for leverage. Using a split-hand technique with one hand on the horn and one hand on the grip end cap, apply pressure and slide the grip down the shaft until it is ‘seated’ on the end of the shaft and the bottom of the grip is stretched to the mark you made for optimal grip length. Your bottom hand should apply all of the force, while the top hand should only guide the grip. The grip should gently slide on in one motion, but don’t force it. If it catches anywhere on the shaft, stop, pull the horn up to remove the grip, and start again!
Tips
- You should feel and may hear a “thump” when the grip is fully seated on the end of the shaft.
- Do not squeeze the rubber when sliding the grip down the shaft. Apply pressure only to the horn; Squeezing the rubber will prevent the grip from being able to slide down the shaft.
Once you have slid the grip onto the shaft, grasp the grip just above the horn to hold it in place and pull the horn towards the club head until it is no longer underneath the grip. Then, slide the horn down to the bottom of the shaft and use the slit in the horn to remove it from the shaft.
Tips
- Removing the horn from underneath the grip will require some force. It will not slide out immediately.
Once the grip has been placed on the shaft, use the box in which your grips arrived to ensure that Concept Helix is the proper length and has not been stretched too far down the shaft and that it is fully seated on the end of the shaft. Place one end of the grip next to the “H” marked on the box; the grip should reach the “X” marked on the other side of the box.
Tips
- Note: If you do not have the box, use a ruler or tape measure to check grip length. The Concept Helix grip should measure 10.25”.
- Check grip length using the box provided both before and after removing the horn from underneath the grip. Removing the horn can cause some minor stretching of the grip down the shaft.
- If your grip is shorter or longer than the box, use the horn to move the bottom of the grip up or down so it is the correct length.
Using one hand to hold the clubhead for leverage, place the bottom of the horn on the grip end cap and twist in the ‘ON’ direction designated on the horn, until you cannot twist the horn any further (about 30 half-turns).
Tips
- Grasp the horn with your entire hand in order to apply maximum torque with each turn.
- More than 30 turns may be required until the endcap is fully tightened. You will be able to feel resistance when you have made enough turns with the horn.
- You may find it easier to hold the horn & end cap in one place, and twist the club head with your hand, until the grip is tightened.
Set the horn aside. Using one hand to hold the clubhead for leverage, place your other hand on the bottom of the grip and twist clockwise - the same direction you twisted the horn. Next, twist the middle section of the grip, the top section of the grip, and then the white endcap section. Return to the bottom section and repeat, twisting clockwise until each section of the grip is fully tightened and you are unable to twist any further, using care to not over-twist. You should only hear a clicking noise when twisting the top section of the grip. Each time you twist the grip from bottom to top you should rotate the endcap and hear a clicking sound. This locks the grip in place so it stays in position during play.
Tips
- Be sure to only use one hand on the grip when twisting. If you hold the grip with one hand and twist with the other hand, you will not be able to tighten the grip properly.
- Much of the tightening with your hands will occur in the top and endcap sections. Use caution not to over-twist the lower or middle sections.
- Use caution not to over-twist the lower or middle sections. The grip pattern will bunch up if any section is over-tightened.
To lock in the grip, key the horn into the end cap and twist in the “ON” direction designated on the horn, approximately 8-10 times until it cannot rotate anymore. You don't have to crank, but there should be good resistance.
Tips
- Once you have installed Concept Helix grips, keep the horn in your golf bag or car. You may need to make adjustments or follow tightening steps again once you have used the grips on the course!
Step 3: Removing Concept Helix Grips
The Tools You'll Need to Start
Horn
Concept Helix Grip
Place the horn on the end cap and twist the horn in the ‘OFF’ direction, as specified, until you can feel reduced tension and hear a clicking noise.
Tips
- Using your hands, twist the middle and bottom sections counterclockwise until you can feel reduced tension.
- Remove the horn from the endcap and re-attach the horn to the shaft, placing it near the clubhead and sliding up to the grip.
- Slide the horn prongs underneath the mouth of the grip, until all prongs are covered.
- Place one hand on the shaft and your other hand on the horn, then slide the horn towards the butt end of the club until the grip is removed. Now that you’ve removed Concept Helix, please reinstall/install on all three clubs (steel shaft, driver and hybrid) to get familiar with the process.
4. Reviewing Concept Helix
Your feedback is essential to the continued development of our newest grip technology system. Please pay close attention during the installation process & while playing on the course so that you can offer specific feedback in the installation & performance surveys.
Need More Help?
If you are still having trouble installing your Concept Helix grip after watching the instructional videos provided, we will be happy to provide further assistance. You can reach us at: +1 888-311-3616 from 9AM-6PM EST on weekdays and 9AM-4PM on weekends.
